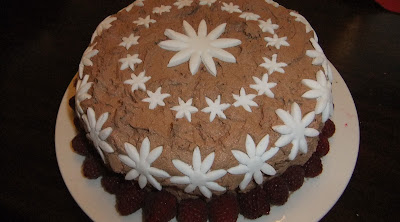
Before we did the sad farewells at the airport, we managed to squeeze in one final dinner at our home with the whole family present. For after dinner I wanted to make a really special chocolate cake. Mum had a wonderful moist chocolate cake recipe she used to always make for birthdays and special occasions. Unfortunately I seem to have misplaced the furry book I wrote down all of mums best recipes in before I moved out of home so had to find another recipe to use.
After scouring through all my cookbooks, I settled on the Raspberry Blackout cake from Vegan with a Vengeance. This recipe just jumped out at me as something I really wanted to try, and Isa's recipes have never let me down yet. I've noticed that this recipe has already been published on a number of blogs (not all of which give her credit as the source) so it seemed to be a rather popular recipe too.
Raspberry Blackout Cake
1 1/2 cups all-purpose flour
1/2 cup Dutch cocoa powder
1 tsp baking powder
1 tsp baking soda
1/2 tsp salt
1 1/2 cups plain rice or soy milk
1/2 cup canola oil (I used almond as I had no canola)
10 oz jar of raspberry jam with 1/2 cup reserved for the batter (I didn't have enough raspberry so I made up the difference with sour cherry in the batter)
2 tsp vanilla extract
1 1/4 cups sugar
Fresh raspberries for decorating and yumminess
- Preheat oven to 175C or 350F. Spray two 20cm/8 inch round springform cake pans with cooking spray. If you don't have springform pans, line the bottom of ordinary round pans to prevent sticking.
- Sift together the flour, cocoa powder, baking powder, baking soda and salt.
- Combine the milk, oil, 1/2 cup of the jam, the vanilla, and the sugar in a large bowl and mix with a hand mixer or strong fork. The jam should be mostly dissolved with the rest of the ingredients; some small clumps are okay.
- Add the dry ingredients to the wet in batches and mix until everything is incorporated.
- Divide the batter between the prepared pans and bake for 40-45 minutes, or until a toothpick or knife comes out clean.
- Remove from oven and let cool in pans.
- When the cakes have cooled fully, spread one layer of cake with a think layer of the remaining raspberry jam (give the jam a quick mix to get a spreadable consistency); spread a layer of chocolate icing on top of the preserves.
- Place the other layer of cake on top and spread its top with preserves.
- Carefully spread the chocolate icing over the top, then ice the sides.
 |
| A naked raspberry blackout cake patiently awaiting icing |
In the book, the cake is topped with a 'ganache-y frosting' I didn't have choc chips, so made a chocolate butter cream icing.
Chocolate butter cream icing
1 cup of vegan margarine
500 grams of icing sugar (I used billingtons golden icing sugar which has a lovely flavour)
2 tbsp soy milk
2 tbsp dutch cocoa powder
- Place all margarine in a mixing bowl and slowly blend in half the icing sugar.
- Blend in the milk and cocoa.
- Add the remaining icing sugar and mix well.
- Chill till ready to use.
 |
| Getting there, but it needs something more... |
 |
| Decorated cake, not over the top at all... |
The cake had a great flavour and the jam made for a really moist, fudgy, rich chocolate cake that everyone loved. This is a cake recipe that I think I will be using often and I think would be perfect as a base for some more fancy cake decorating or shaped cakes as it held it's shape really well and did not crumble or crack.
 |
| So so yummy! |
Yum!
It looks so puuuurty!
ReplyDeleteThank you :-)
ReplyDeleteDoesn't even come close to your impressive cake decorating efforts though.